


Show how a hydrogen–air mixture can gain explosive properties using a plastic drink bottle in this demonstration
In this experiment, students observe as a large fizzy drink bottle, from which the base has been removed, is filled with hydrogen. The hydrogen is allowed to burn at a small jet in the stopper of the bottle. As the hydrogen–air mixture changes in composition, an explosive mixture is reached, which students can witness exploding with a load bang.
This simple demonstration can be used for fun, such as on open days, or to provide an illustration of the effect of composition of a flammable gas and air mixture on its explosive properties. The experiment can also be linked to domestic gas explosions, along with this similar demonstration using methane to create an explosion inside a tin can.
It can also be used to introduce the idea of the conversion of chemical energy into heat, light, sound and kinetic energy in the context of fuels.
The time for carrying out the demonstration should be about ten minutes.
Equipment
Apparatus
- Eye protection for the demonstrator
- Ear protectors for the demonstrator
- Safety screens, x2
- ‘Fizzy’ drink bottle, 1 dm3, no larger (see notes on setting up the apparatus below)
- One-holed bung, to fit bottle
- Short length of glass tubing, about 5 cm, to fit in bung (see notes on setting up the apparatus)
- Short length (about 5 cm) of rubber tubing, to fit glass tube (see notes on setting up the apparatus)
- Hoffman or screw clip, for rubber tubing
- Gas delivery tube
- Large plastic or glass trough, for collecting gas over water
- Boss, clamp and stand
- Wooden splints (see note 4 below)
Chemicals
- A source of hydrogen gas (EXTREMELY FLAMMABLE): cylinder and regulator fitted with a length (about 50 cm) of rubber tubing
Health, safety and technical notes
- Read our standard health and safety guidance.
- Wear eye protection throughout.
- Hydrogen, H2(g), (EXTREMELY FLAMMABLE) – see CLEAPSS Hazcard HC048. It is recommended that this demonstration is only attempted using hydrogen from a cyclinder and not hydrogen from a chemical generator because of the difficulty of generating the gas fast enough to flush the air out of the apparatus reliably.
- Some teachers may prefer to light the gas with using a wax taper or candle attached to the end of a metre rule. It is useful to have a Bunsen burner lit some distance from the can, for lighting the splint, taper or candle. If the tin or bottle has not been completely flushed with hydrogen or some air has re-entered the tin (likely if there is a delay between filling the tin and igniting the gas), the explosion can occur immediately on igniting the gas. The demonstrator, and the class, should be prepared for this.
Setting up the apparatus
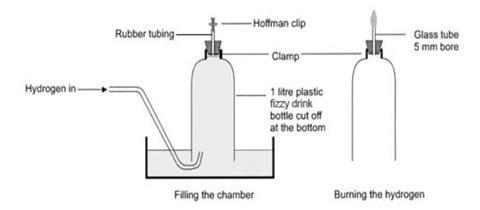
Cut the bottom off the drinks bottle and replace the cap with a bung carrying a short length of glass tubing to which is attached a short length of rubber tubing and a clip – see the diagram below. The glass tube must not protrude into the bottle beyond the bottom of the bung.
In the past a large (500–750 g) tin can with a press-on lid (such as a catering size instant coffee tin) has often been used for this demonstration. Such tins are harder to find nowadays. If such a tin is used, then a small (about 4 mm in diameter) hole must be made in the lid, and a larger (about 1 cm diameter) hole in the base. Another alternative is a cardboard container fitted with a plastic lid (such as a Pringle crisp container). In both cases the container must be filled with hydrogen by inserting the delivery tube into the hole in the base and allowing at least one minute to ensure that all the air has been flushed from the container. The hole in the lid should then be sealed with a small piece of plasticine or flexible adhesive material (such as Blu-Tak). The container should then be placed on a tripod or clamped with some clearance below. Take care not to site it underneath light fittings that could be damaged by the flying lid.
Make sure the rubber tubing is an airtight fit, but it can be prised off easily before the gas is ignited. If the glass tube is too narrow, it may not support the flame as it ‘backfires’ down the tube into the bottle.
Procedure
- Fill the trough with water and clamp the bottle in position with its bottom well below the water level. Place a safety screen between the bottle and the class, who should be at least 2 m away. Provide protection for the demonstrator with a second screen.
- Fill the bottle with water by opening the clip and sucking up water from the trough until it is just below the glass tube in the bung. Tighten the clip sufficiently to prevent the water level dropping.
- Fill the bottle with hydrogen, using the delivery tube, until bubbles start to escape from the bottom. Shut off the hydrogen supply and move it away
- Raise the clamp holding the bottle so that the trough can be slid away. Re-tighten the clamp. Light a splint and, holding it in one hand, remove the rubber tubing and clip from the bottle with the other hand. Ignite the hydrogen escaping from the top of the tube and step back from the bottle. The gas should burn with a small flame, which may be yellow at first, then turn blue and be almost invisible in daylight. After about 20–30 seconds the flame will decrease in size and appear to go out. Shortly afterwards there will be a loud explosion. (If a tin or cardboard tube is used – see notes on setting up the apparatus – the lid will fly into the air.)
Teaching notes
The reaction occurring is the combustion of hydrogen to form water:
2H2(g) + O2(g) → 2H2O(g)ΔH = –484 kJ mol–1
The energy released appears as heat, light, sound and kinetic energy, similar to the situation in an internal combustion engine. Mixtures of air and flammable gases usually have quite narrow explosive limits but hydrogen-air mixtures are explosive over a much broader range (4–77 mol% hydrogen).
Archival footage of the explosion of the hydrogen-filled airship ‘Hindenburg’ in 1937 could add interest here. This explosion would have been much more serious but for the fact that because of hydrogen’s very low density, most of the flames swept rapidly upwards rather than spreading sideways and downwards.
The source of the energy for this reaction could be discussed, with a suitable group, in terms of the breaking and making of bonds.
In view of the current interest in fuel cells as a source of energy for vehicles, it could be pointed out that a hydrogen fuel cell extracts the energy from this reaction in the form of electricity, rather than explosively in the form of heat. This electrical energy can be used much more efficiently to propel a vehicle than the equivalent amount of heat energy.
Additional information
This is a resource from the Practical Chemistry project, developed by the Nuffield Foundation and the Royal Society of Chemistry. This collection of over 200 practical activities demonstrates a wide range of chemical concepts and processes. Each activity contains comprehensive information for teachers and technicians, including full technical notes and step-by-step procedures. Practical Chemistry activities accompany Practical Physics and Practical Biology.
The experiment is also part of the Royal Society of Chemistry’s Continuing Professional Development course: Chemistry for non-specialists.
© Nuffield Foundation and the Royal Society of Chemistry
Health and safety checked, 2016


No comments yet