


Task students to separate an insoluble material from a soluble one in this experiment using sand and salt
This is a very straightforward experiment. It can be carried out individually or in groups of two. Pupils must stand up during heating activities and beware of hot salt spitting when evaporation is almost complete.
Equipment
Apparatus
- Eye protection
- Beaker, 250 cm3
- Glass stirring rod
- Filter funnel
- Filter paper
- Conical flask, 250 cm3
- Evaporating basin
- Bunsen burner
- Heat resistant mat
- Tripod
- Gauze
Chemicals
- Mixture of sand and sodium chloride (salt), about 6–7 g per group of students (a suitable sand–salt mixture should contain approximately 20% salt by mass)
Health, safety and technical notes
- Wear eye protection throughout this experiment.
- Pupils must stand up during heating activities and beware of hot salt spitting when evaporation is almost complete.
- Sodium chloride (eg table salt), NaCl(s) - see CLEAPSS Hazcard HC047b.
Procedure
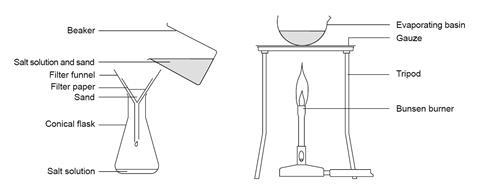
- Pour the sand–salt mixture into the beaker so that it just covers the base.
- Add about 50 cm3 of water, or add water until the beaker is about one-fifth full.
- Stir the mixture gently for a few minutes.
- Filter the mixture into a conical flask.
- Pour the filtrate into an evaporating basin.
- Heat the salt solution gently until it starts to decrepitate (spit). CARE: Keep eye protection on and do not get too close.
- Turn off the Bunsen burner and let the damp salt dry in the dish.
Teaching notes
If desired, the experiment can be extended to isolate dry samples of sand and salt. To do this, the damp sand in the filter paper can be transferred to another sheet of dry filter paper, and, by folding and dabbing, the sample can be dried. If necessary, another piece of filter paper can be used.
Students often like to present their specimens in small bottles for approval, so a spatula could be used to accomplish this. While the first student of a pair is transferring the sand, the other can be scraping the dried salt from the evaporating dish and transferring it to another specimen bottle.
If this extension is carried out, the students should be encouraged to label the bottles. They should be told that all samples prepared in this way need to be labelled, even if in this case, it should be obvious which substance is which.
Student questions
- Why can sand and salt be separated using this experiment?
- Why is the salt, sand and water mixture stirred in step 3?
- Why is the salt solution heated in step 6?
- How might the final traces of water be removed from your samples to ensure that they are totally dry?
- Give two reasons why the sand you have obtained might still be contaminated with salt.
- How could you adapt your experiment to obtain a purer sample of sand?
- Give two reasons why the salt you have obtained might still be contaminated with sand.
- How could you adapt your experiment to obtain a purer sample of salt?
Primary science teaching notes
If you teach primary science, the following information is designed to help you use this resource.
Skill development
Children will develop their working scientifically skills by:
- Drawing conclusions and raising further questions that could be investigated, based on their data and observations.
- Using appropriate scientific language and ideas to explain, evaluate and communicate their methods and findings.
Learning outcomes
Children will:
- Observe that some materials will dissolve in liquid to form a solution.
- Describe how to recover a substance from a solution.
- Use knowledge of solids, liquids and gases to decide how mixtures might be separated, including through filtering, sieving and evaporating.
- Demonstrate that dissolving, mixing and changes of state are reversible changes.
Concepts supported
Children will learn:
- That there are various techniques that can be used to separate different mixtures.
- That dissolving is a reversible reaction.
- That not all solids are soluble.
- That the rate of dissolving can be affected by various factors.
- That melting and dissolving are not the same process.
Suggested activity use
This activity can be used as a whole-class investigation, with children working in small groups or pairs to look at how to separate the salt and sand. This could provide a stimulus for further investigations looking at how to separate other mixtures of solids, either of different particle sizes or by solubility.
Practical considerations
Primary schools often don’t have Bunsen burners, so viable alternatives need to be sourced. Similarly, it may be difficult to source the equipment needed to evaporate water to recover the dissolved salt. Head stands and tea lights can work well as possible alternatives.
When carrying out this activity be aware that some insoluble solids are able to form suspensions. This is where the particles appear to have dissolved, when in fact they have been spread out throughout the liquid. A good indicator that a suspension has formed is that the liquid will go cloudy or the particles can be heard scraping as the mixture is stirred.
The layout of this activity is very prescriptive as the procedure is set out on a step by step basis. An open challenge activity, with children working in small groups and devising their own methods, would extend the children’s thinking. Different groups’ suggestions could be compared and evaluated as a class.
Additional information
This is a resource from the Practical Chemistry project, developed by the Nuffield Foundation and the Royal Society of Chemistry.
Practical Chemistry activities accompany Practical Physics and Practical Biology.
© Nuffield Foundation and the Royal Society of Chemistry


2 readers' comments